Enhance Safety and Avoid Blind Spots with a Step-by-Step DIY Installation for Crystal-Clear Rear Visibility!
1. Why Install a Backup Camera? ⚠️
Backup cameras are no longer a luxury—they’re a safety essential. Benefits include:
- Preventing accidents: Reduces blind zones by 90% (NHTSA).
- Easier parking: Guides for parallel parking and tight spaces.
- Night visibility: Infrared or LED-lit cameras see in the dark.
- Resale value boost: Modern buyers expect this feature.
Key Stat: Backup cameras reduce rear collisions by 42% (IIHS).

2. Types of Backup Cameras 🧩
| Type | Best For | Pros & Cons |
|---|---|---|
| License Plate Frame | Easy installation | Discreet, but limited adjustability |
| Flush-Mount | OEM look | Requires drilling, clean finish |
| Wireless | Minimal wiring | Prone to interference |
| Mirror/Display | Built-in screen | No extra dash screens needed |
Pro Tip: Choose a waterproof camera (IP67+ rating) for durability.
3. Tools & Materials Needed 🧰
- Backup camera kit (50–200).
- Trim removal tools (plastic pry bars).
- Drill & hole saw (for flush mounts).
- Wire strippers, electrical tape, zip ties.
- Fuse tap or reverse light wire for power.
- Multimeter (to test circuits).
Cost: 80–250 (DIY) vs. 300–600 (pro install).
4. Step-by-Step Installation Guide 🔌
Step 1: Choose Camera Location
- License plate: Easiest, no drilling.
- Flush-mount: Drill a hole above the license plate or bumper.
- Tailgate handle: Integrates with factory design.

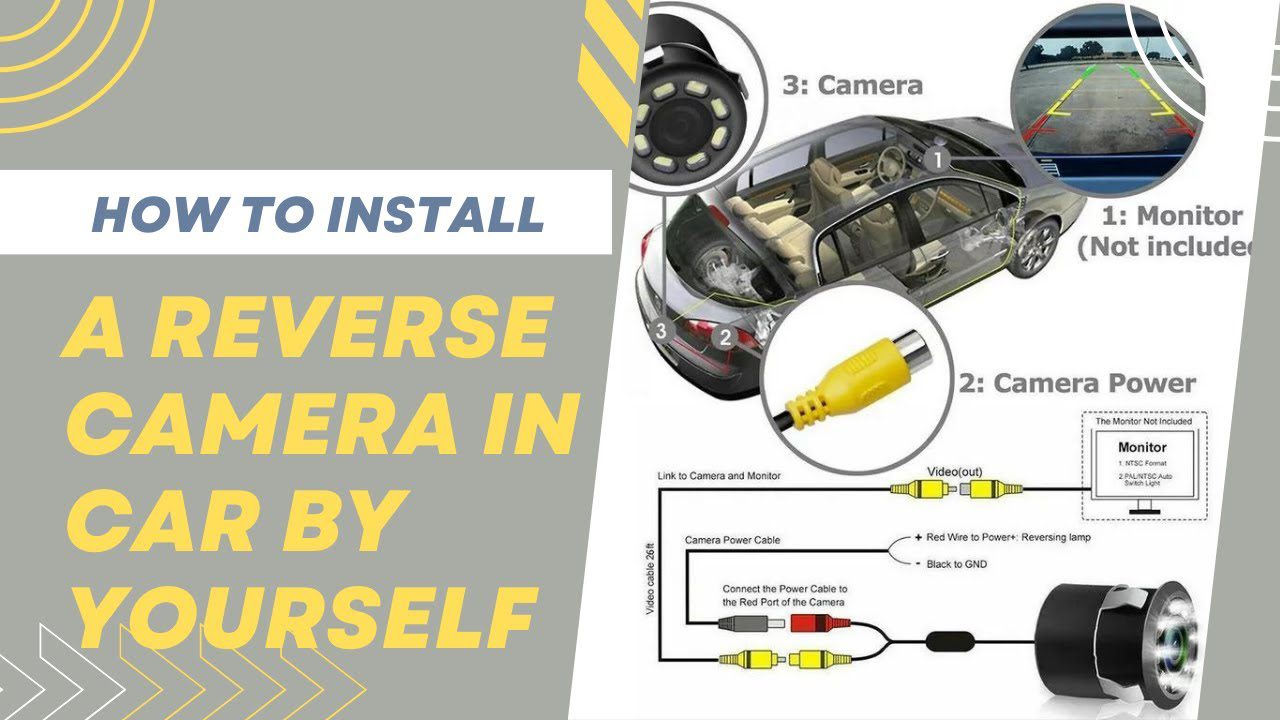
Step 2: Run Wires from Camera to Display
- Remove interior trim: Route wires under door sills or headliner.
- Connect video cable:
- For wired cameras: Run RCA cable from rear to dashboard.
- For wireless: Pair transmitter (rear) with receiver (front).
- Secure wires: Avoid pinching with zip ties.
Step 3: Connect to Power Source
- Option 1: Tap into reverse light wire (powers camera only in reverse).
- Locate reverse light wire (use multimeter).
- Splice using posi-tap connectors.
- Option 2: Use a fuse tap (constant power for always-on cameras).
Warning: Never connect directly to the battery without a fuse!
Step 4: Connect to Display
- Mirror display: Plug into rearview mirror’s video input.
- Dash screen: Connect to aftermarket head unit via RCA.
- Wireless receiver: Pair with the camera transmitter.

Step 5: Calibrate Guidelines
- Auto-calibration: Some systems adjust guidelines automatically when reversing.
- Manual adjustment:
- Use test cones or markers 6 feet apart.
- Enter calibration mode (check manual) and align guidelines.
Pro Tip: Test at night to ensure IR LEDs illuminate properly.
5. Common Mistakes to Avoid 🚫
- Poor wire routing: Loose cables cause interference or damage.
- Ignoring polarity: Reverse light wires have +/- connections.
- Wrong camera angle: Tilt the camera slightly downward for optimal view.
- Skipping sealant: Waterproof drilled holes with silicone.

6. Cost Comparison: DIY vs. Pro 💸
| Service | DIY Cost | Pro Cost |
|---|---|---|
| Basic Camera Kit | 50–150 | 300–400 |
| OEM Integration | 200–400 | 500–800 |
Savings: DIY cuts costs by 60%+ with basic tools.
7. FAQs ❓
Q1: Is a backup camera legal?
A: Yes, and required in U.S. cars made after May 2018.
Q2: Can I install a camera without a new head unit?
A: Yes—use a mirror display or wireless monitor.
Q3: Why is my camera image blurry?
A: Clean the lens or check for loose connections.
Q4: How do I power an always-on camera?
A: Use a fuse tap on an ignition-switched circuit.
Q5: Can I add dynamic guidelines?
A: Only with cameras that support steering wheel sensor input.
8. Pro Tips for a Clean Install 💡
- Use OEM-style kits: Match factory colors and shapes (e.g., Brandmotion).
- Test before finalizing: Confirm video feed before hiding wires.
- Upgrade to 4K: For trucks/RVs, consider high-res cameras.
- Add a rear washer: Keep the lens clean in mud/snow.
9. Free Installation Checklist PDF 📝
[🔗 Download Your Free Guide Here]
Includes:
- Wiring diagrams by car model.
- Calibration marker templates.
- Troubleshooting common issues.
Expand Your Automotive Knowledge 📝
Explore 500+ Free Expert-Curated Guides
🚗 Learn New Skills
From basic maintenance to advanced repairs — clear, actionable tutorials for every skill level.
🌍 Access Anywhere
Mobile-friendly guides with HD visuals. No downloads required.
- Guides & Tutorials
- Car Maintenance 101
- Diagnostics & Troubleshooting
- Seasonal Maintenance
- Budget-Friendly Repairs
- Electrical Systems Guide
- Car Safety & Reliability
- Tools & Product Reviews
- Routine Maintenance
- Car Modifications & Upgrades
- Buying/Selling Guides
- Eco-Friendly Car Care
- Advanced Repairs
- Car Laws & Compliance
- Emergency Repairs
- Future Car Tech