Table of Contents
Why Debadge Your Car?
- Sleek Aesthetics: A badge-free exterior screams modern sophistication.
- Easier Maintenance: No more wax buildup in crevices or snagged microfiber towels.
- Customization: Make your car uniquely yours by ditching factory labels.
🛠 Tools & Materials You’ll Need
| Icon | Item | Purpose |
|---|---|---|
| 🎣 | Fishing Line (20–30 lb) | Safely slices through adhesive without scratches. |
| 🔥 | Hair Dryer/Heat Gun | Softens stubborn adhesive (low/medium heat). |
| 🧴 | Adhesive Remover | Dissolves residue (Goo Gone, WD-40, or 3M Adhesive Remover). |
| 🪄 | Plastic Trim Tool | Safely lifts leftover glue without damaging paint. |
| 🧼 | Rubbing Alcohol | Cleans the surface post-removal. |
| 🧤 | Microfiber Towels | For polishing and buffing. |
| 🧴 | Polish & Wax | Restores shine (Meguiar’s Ultimate Compound + Carnuba Wax). |
Cost: 10–10–20 if buying supplies new.
📝 Step-by-Step Guide
1. Prep the Area
- Wash and dry the badge area thoroughly. Dirt can scratch paint during removal.
- Heat the badge with a hair dryer for 1–2 minutes (optional but helpful for older badges).
2. Slice Through the Adhesive
- Cut a 12-inch fishing line and wrap the ends around your fingers (like dental floss).
- Slide the line behind the badge and use a sawing motion to cut through the adhesive.
- Pro Tip: Angle the line parallel to the car’s surface to avoid paint scratches.
3. Remove the Badge
- Once the adhesive is cut, gently pry off the badge. If resistance occurs, reheat the area.
4. Tackle Adhesive Residue
- Spray adhesive remover on leftover glue and let it sit for 2–3 minutes.
- Use a plastic trim tool to scrape residue gently. Avoid metal tools!
- For stubborn bits, repeat the adhesive remover or use a citrus-based solvent.
5. Clean and Polish
- Wipe the area with rubbing alcohol to remove oily residue.
- Apply polishing compound to eliminate shadow marks or micro-scratches.
- Finish with carnuba wax to protect the paint and blend the spot seamlessly.
6. Final Inspection
- Check for leftover glue under bright light. Repeat steps 4–5 if needed.
❗ Critical Tips to Avoid Damage
- Never use knives or metal scrapers—they will scratch your paint.
- Test solvents first: Apply adhesive remover to a small, hidden area to check for discoloration.
- Work in shade: Direct sun can dry solvents too quickly or overheat the paint.
🛑 Common Mistakes
- Rushing the process: Patience prevents paint chips and glue streaks.
- Skipping polish/wax: Unprotected paint may fade unevenly over time.
🔧 Aftercare & Maintenance
- Reapply wax monthly to maintain a uniform finish.
- Avoid automatic car washes for 1–2 weeks to let the wax fully cure.
🎨 Alternatives to Permanent Debadging
- Vinyl badge covers: Blackout or color-match badges without removal.
- Relocate badges: Create a custom layout (e.g., move rear emblems to the windshield).
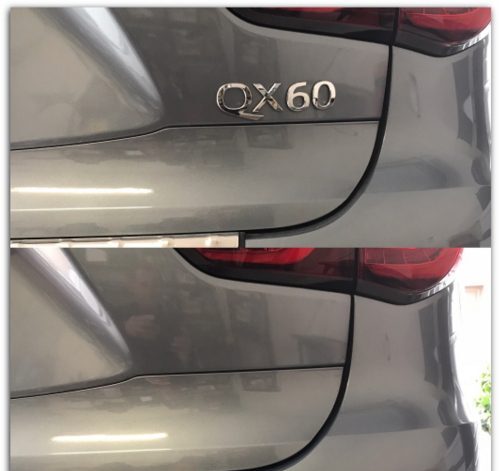
📸 Example Results:

Smooth, badge-free panels vs. stock emblems.
✅ Done! Your car now boasts a clean, head-turning profile. Share your debadging journey with #BadgeFreeRide!
Expand Your Automotive Knowledge 📝
Explore 500+ Free Expert-Curated Guides
🚗 Learn New Skills
From basic maintenance to advanced repairs — clear, actionable tutorials for every skill level.
🌍 Access Anywhere
Mobile-friendly guides with HD visuals. No downloads required.
- Guides & Tutorials
- Car Maintenance 101
- Diagnostics & Troubleshooting
- Seasonal Maintenance
- Budget-Friendly Repairs
- Electrical Systems Guide
- Car Safety & Reliability
- Tools & Product Reviews
- Routine Maintenance
- Car Modifications & Upgrades
- Buying/Selling Guides
- Eco-Friendly Car Care
- Advanced Repairs
- Car Laws & Compliance
- Emergency Repairs
- Future Car Tech


