Table of Contents
Save $1,000+ on Installation—Learn Step-by-Step Wiring, Safety Tips, and Code Compliance!
1. Why Install a Home EV Charger? ⚠️
A home charger saves time and money vs. public stations, but DIY installation requires precision. Benefits include:
- Cost savings: Avoid 1,000–2,500 in electrician fees.
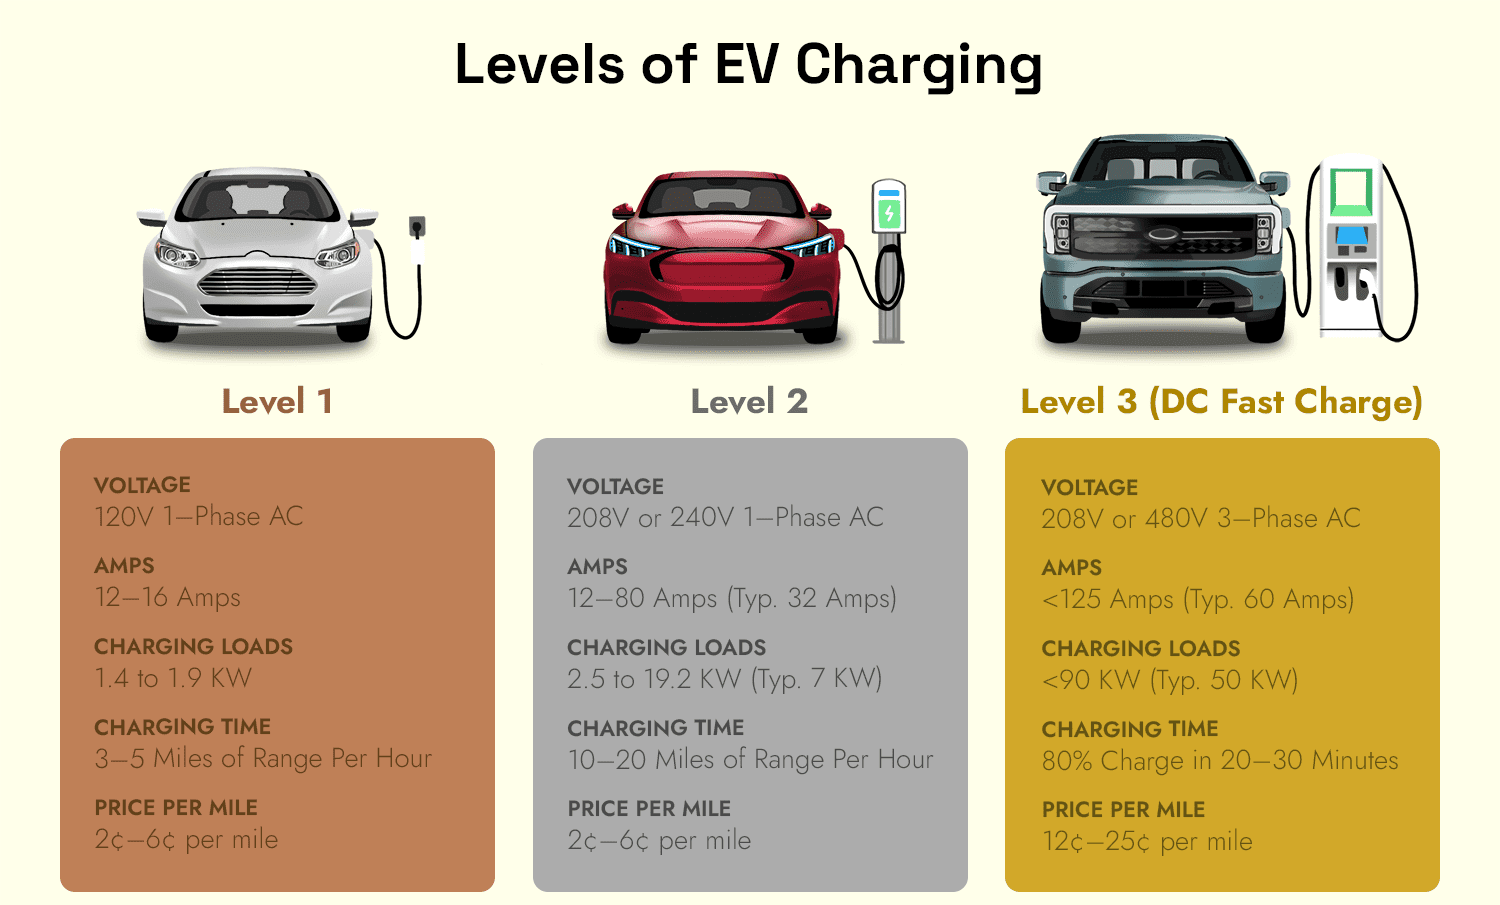
- Convenience: Charge overnight at 20–60 miles of range per hour (Level 2).
- Resale value: Homes with EV chargers sell 1.5x faster (Zillow).
Key Stat: Level 2 chargers cut charging time by 50–70% vs. Level 1 (DOE).
2. Pre-Installation Prep: Tools & Materials 🛠️
Tools Needed:
- Voltage tester
- Wire strippers
- Drill with masonry bits
- Screwdrivers (Phillips + flathead)
- Conduit bender
Materials Needed:
- Charger Unit: Charge Point Home Flex (699) or Juice Box 40 (649).
- Circuit Breaker: 50–60 Amp dual-pole (e.g., Siemens Q260).
- Wiring: 6 AWG copper THHN wire (for 50 Amp circuits).
- Conduit: 1-inch EMT or PVC.
Pro Tip: Buy 10% extra wire for adjustments.
3. Step-by-Step Installation Guide 🔌
Step 1: Check Electrical Panel Capacity
- Requirement: 200 Amp service recommended for 50–60 Amp circuits.
- Red Flag: Older panels (100 Amp or Federal Pacific) may need upgrades.
Step 2: Choose Charger Location
- Indoor/Outdoor: Use weatherproof units (NEMA 4 rating) for outdoor installs.
- Distance: Keep within 15–20 feet of the panel to minimize voltage drop.
Step 3: Obtain Permits
- Codes: Follow NEC Article 625 (EV charging systems).
- Process: Submit plans to local building department (50–200 fee).
Pro Tip: Schedule inspection before closing walls!
Step 4: Install the Circuit Breaker
- Turn off main power at the panel.
- Connect hot wires (black + red) to the 50 Amp breaker.
- Attach neutral (white) and ground (green) to bus bars.
Warning: Incorrect wiring risks fire—double-check connections!
Step 5: Run Wiring Through Conduit
- Route: Secure conduit from panel to charger location.
- Bends: Use a bender for 90° angles (max four 90s per run).
Graphic 4: Conduit routing example (📏⚡).
Step 6: Mount the Charger
- Height: 18–48 inches above ground (ADA compliance).
- Secure: Use lag bolts for studs or concrete anchors for masonry.
Step 7: Connect Wires to Charger
- Terminals:
- Line 1 (Black) → L1
- Line 2 (Red) → L2
- Neutral (White) → N
- Ground (Green) → ⏚
Test: Use a voltage tester before powering up.
Step 8: Power Up & Test
- Restore main power.
- Enable the circuit breaker.
- Verify charger display lights (green = ready).
4. Safety & Code Compliance 🚨
- GFCI Protection: Required for outdoor units (NEC 2023).
- AFCI Breakers: Optional but recommended for fire prevention.
- Labeling: Mark circuits as “EV Charger” in the panel.
Red Flag: Avoid aluminum wiring—copper only for high amps!
5. Cost Breakdown: DIY vs. Pro 💸
| Expense | DIY Cost | Pro Cost |
|---|---|---|
| Charger Unit | 600–600–800 | 600–600–800 |
| Wiring/Conduit | 150–150–300 | 200–200–500 |
| Permits | 50–50–200 | 50–50–200 |
| Labor | $0 | 800–800–1,500 |
| Total | 800–800–1,300 | 1,650–1,650–3,000 |
Graphic 5: Savings comparison chart (💰📉).
6. Top 5 Mistakes to Avoid 🚫
- Undersized Wiring: 6 AWG for 50 Amps (4 AWG for 60 Amps).
- Skipping Permits: Fines up to $5,000 + insurance voids.
- Poor Grounding: Causes shocks—drive a 8-ft ground rod if needed.
- Overloading Circuits: Dedicated circuit only—no sharing with dryers!
- Ignoring Voltage Drop: Over 3% drop = upgrade wire gauge.
7. FAQs ❓
Q1: Can I use a 240V dryer outlet for charging?
A: Temporarily (with an adapter), but install a dedicated circuit for safety.
Q2: How long does installation take?
A: 6–8 hours for DIY; 4–6 hours for pros.
Q3: Do I need a Wi-Fi-enabled charger?
A: Optional, but smart features (scheduling, usage tracking) add value.
Q4: What if my panel is full?
A: Install a subpanel or load-sharing device (e.g., NeoCharge).
Q5: Does solar power work with EV chargers?
A: Yes! Pair with a 40–60 Amp circuit for sun-powered charging.
8. Free DIY Installation Checklist 📝
[🔗 Download Your Free PDF Here]
Includes:
- Permit application templates.
- Wire gauge calculator.
- Inspection prep guide.
9. Final Tips 💡
- Weatherproofing: Seal conduit ends with silicone to block moisture.
- Future-Proof: Install a 60 Amp circuit for faster future EVs.
- Tag & Test: Label all wires and retest annually.
🚘 Charge smarter, not harder—share this guide to empower fellow EV owners! 🚘
Expand Your Automotive Knowledge 📝
Explore 500+ Free Expert-Curated Guides
🚗 Learn New Skills
From basic maintenance to advanced repairs — clear, actionable tutorials for every skill level.
🌍 Access Anywhere
Mobile-friendly guides with HD visuals. No downloads required.
- Guides & Tutorials
- Car Maintenance 101
- Diagnostics & Troubleshooting
- Seasonal Maintenance
- Budget-Friendly Repairs
- Electrical Systems Guide
- Car Safety & Reliability
- Tools & Product Reviews
- Routine Maintenance
- Car Modifications & Upgrades
- Buying/Selling Guides
- Eco-Friendly Car Care
- Advanced Repairs
- Car Laws & Compliance
- Emergency Repairs
- Future Car Tech

